


Using doc-site for FTD web projects
doc-site for FTD web projectsWe at FifthTry designed and developed FTD langauge for you. Using our own FTD language doc-site is designed for you to create your documentation sites. doc-site also helps authors, entrepreneurs, corporate groups and bloggers to create their own web projects using FTD language.
This simple and easy documentation will help you to modify or update original doc-site with your own web projects.
Creating your first FTD web-sitePlease, refer this documentation to understand how to create FTD website repository on GitHub.
Once you are done these steps follow below steps.
Please, refer this documentation to understand how to create FTD website repository on GitHub.
Once you are done these steps follow below steps.
Editing index.ftd & updating default contentindex.ftd is added by default to your FTD doc-site. Let’s edit its default content with your new content.
🔏 To edit index.ftd file click on index.ftd file from your GitHub repository home. GitHub will open this file as non-editable.
To edit index.ftd file click on edit icon. Once you click on edit icon index.ftd file will be opned for editing into GitHub live editor.
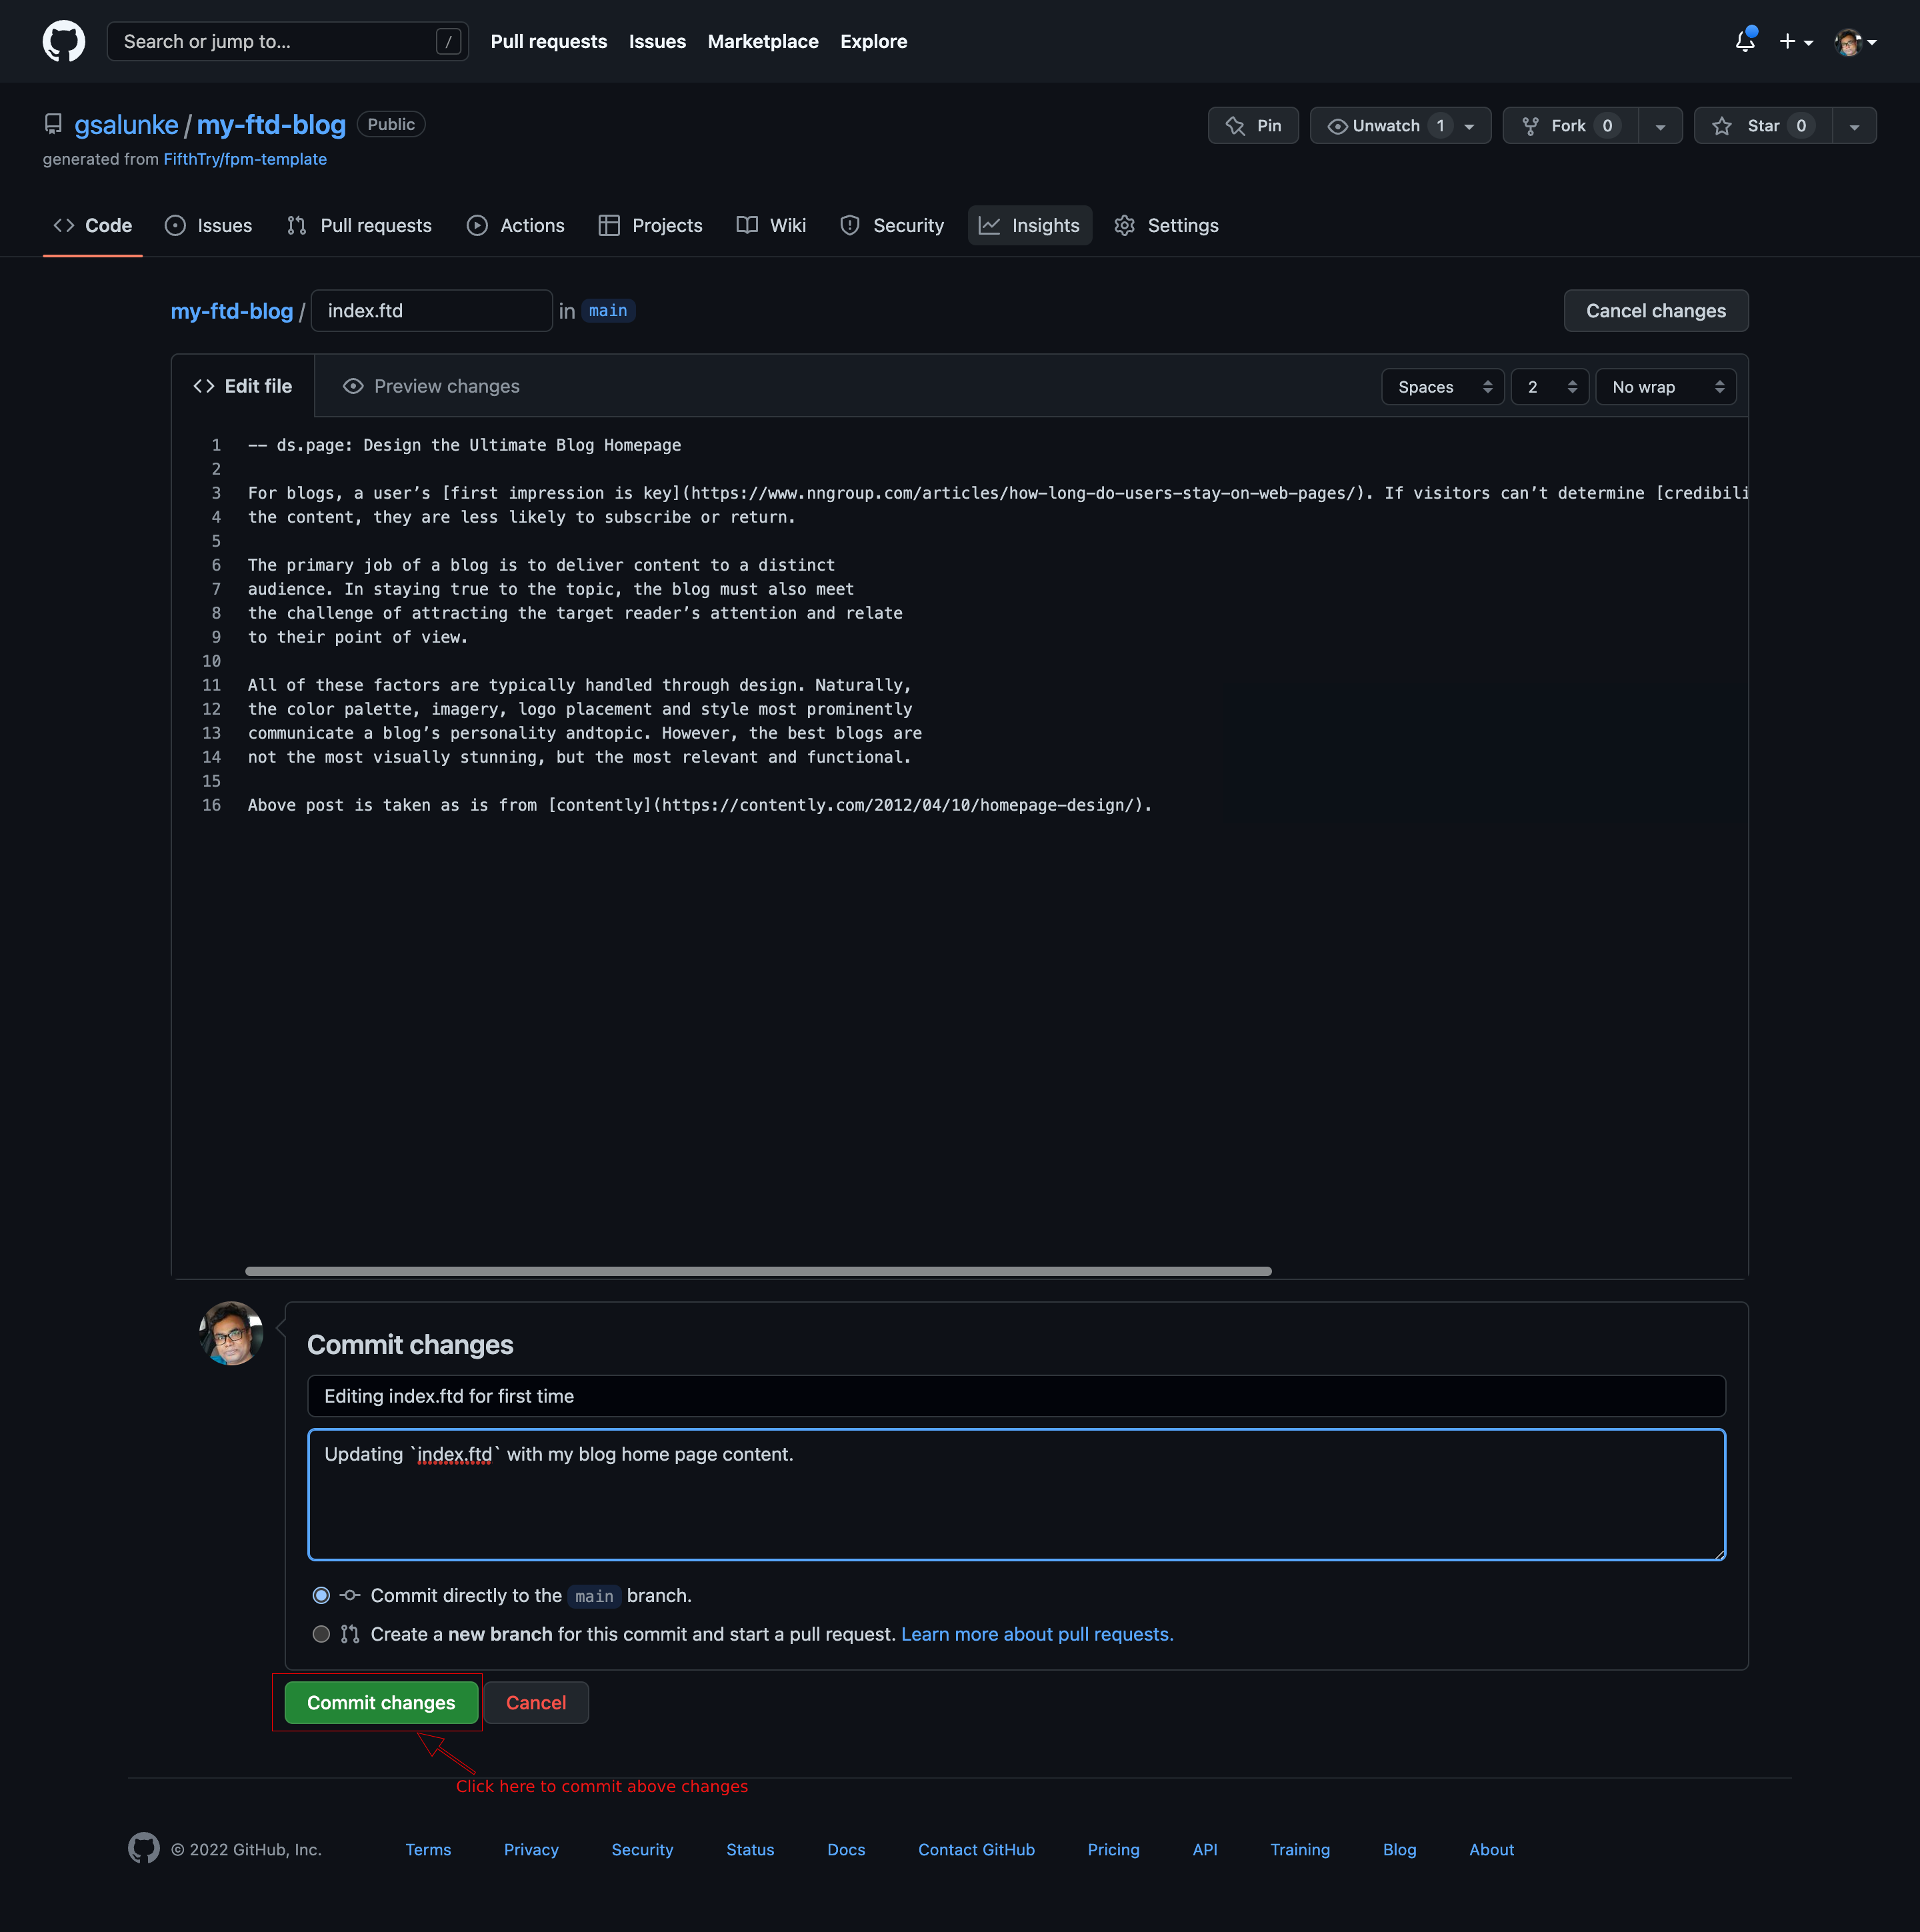
👍 You can start editing index.ftd file with GitHub live editor. Use ds.page syntax to create page for your FTD website homepage. e.g. below code:
index.ftd & updating default contentindex.ftd is added by default to your FTD doc-site. Let’s edit its default content with your new content.
🔏 To edit index.ftd file click on index.ftd file from your GitHub repository home. GitHub will open this file as non-editable.
To edit index.ftd file click on edit icon. Once you click on edit icon index.ftd file will be opned for editing into GitHub live editor.
👍 You can start editing index.ftd file with GitHub live editor. Use ds.page syntax to create page for your FTD website homepage. e.g. below code:
index.ftd using ds.page syntax:-- ds.page: ✨ Design the Ultimate Blog Homepage For blogs, a user’s [first impression is key](https://www.nngroup.com/articles/how-long-do-users-stay-on-web-pages/). If visitors can’t determine [credibility](http://credibility.stanford.edu/), navigate easily or connect with the content, they are less likely to subscribe or return.
The primary job of a blog is to deliver content to a distinct audience. In staying true to the topic, the blog must also meet the challenge of attracting the target reader’s attention and relate to their point of view.
All of these factors are typically handled through design. Naturally, the color palette, imagery, logo placement and style most prominently communicate a blog’s personality andtopic. However, the best blogs are not the most visually stunning, but the most relevant and functional.
Above post is taken as is from contently.
Once you are done with editing index.ftd file. Click on Commit changes button.
ingex.ftd file and Commit changesFPM auto deployment job will run and index.ftd file will be deployed on live automatically by our FPM builder.
To cross-check if pages build and deployment workflow ran successfully. Click on Actions tab.

pages build and deployment workflow should run successfullyOnce you see green tick on pages build and deployment, it means your index.ftd file is successfully deployed on live website.
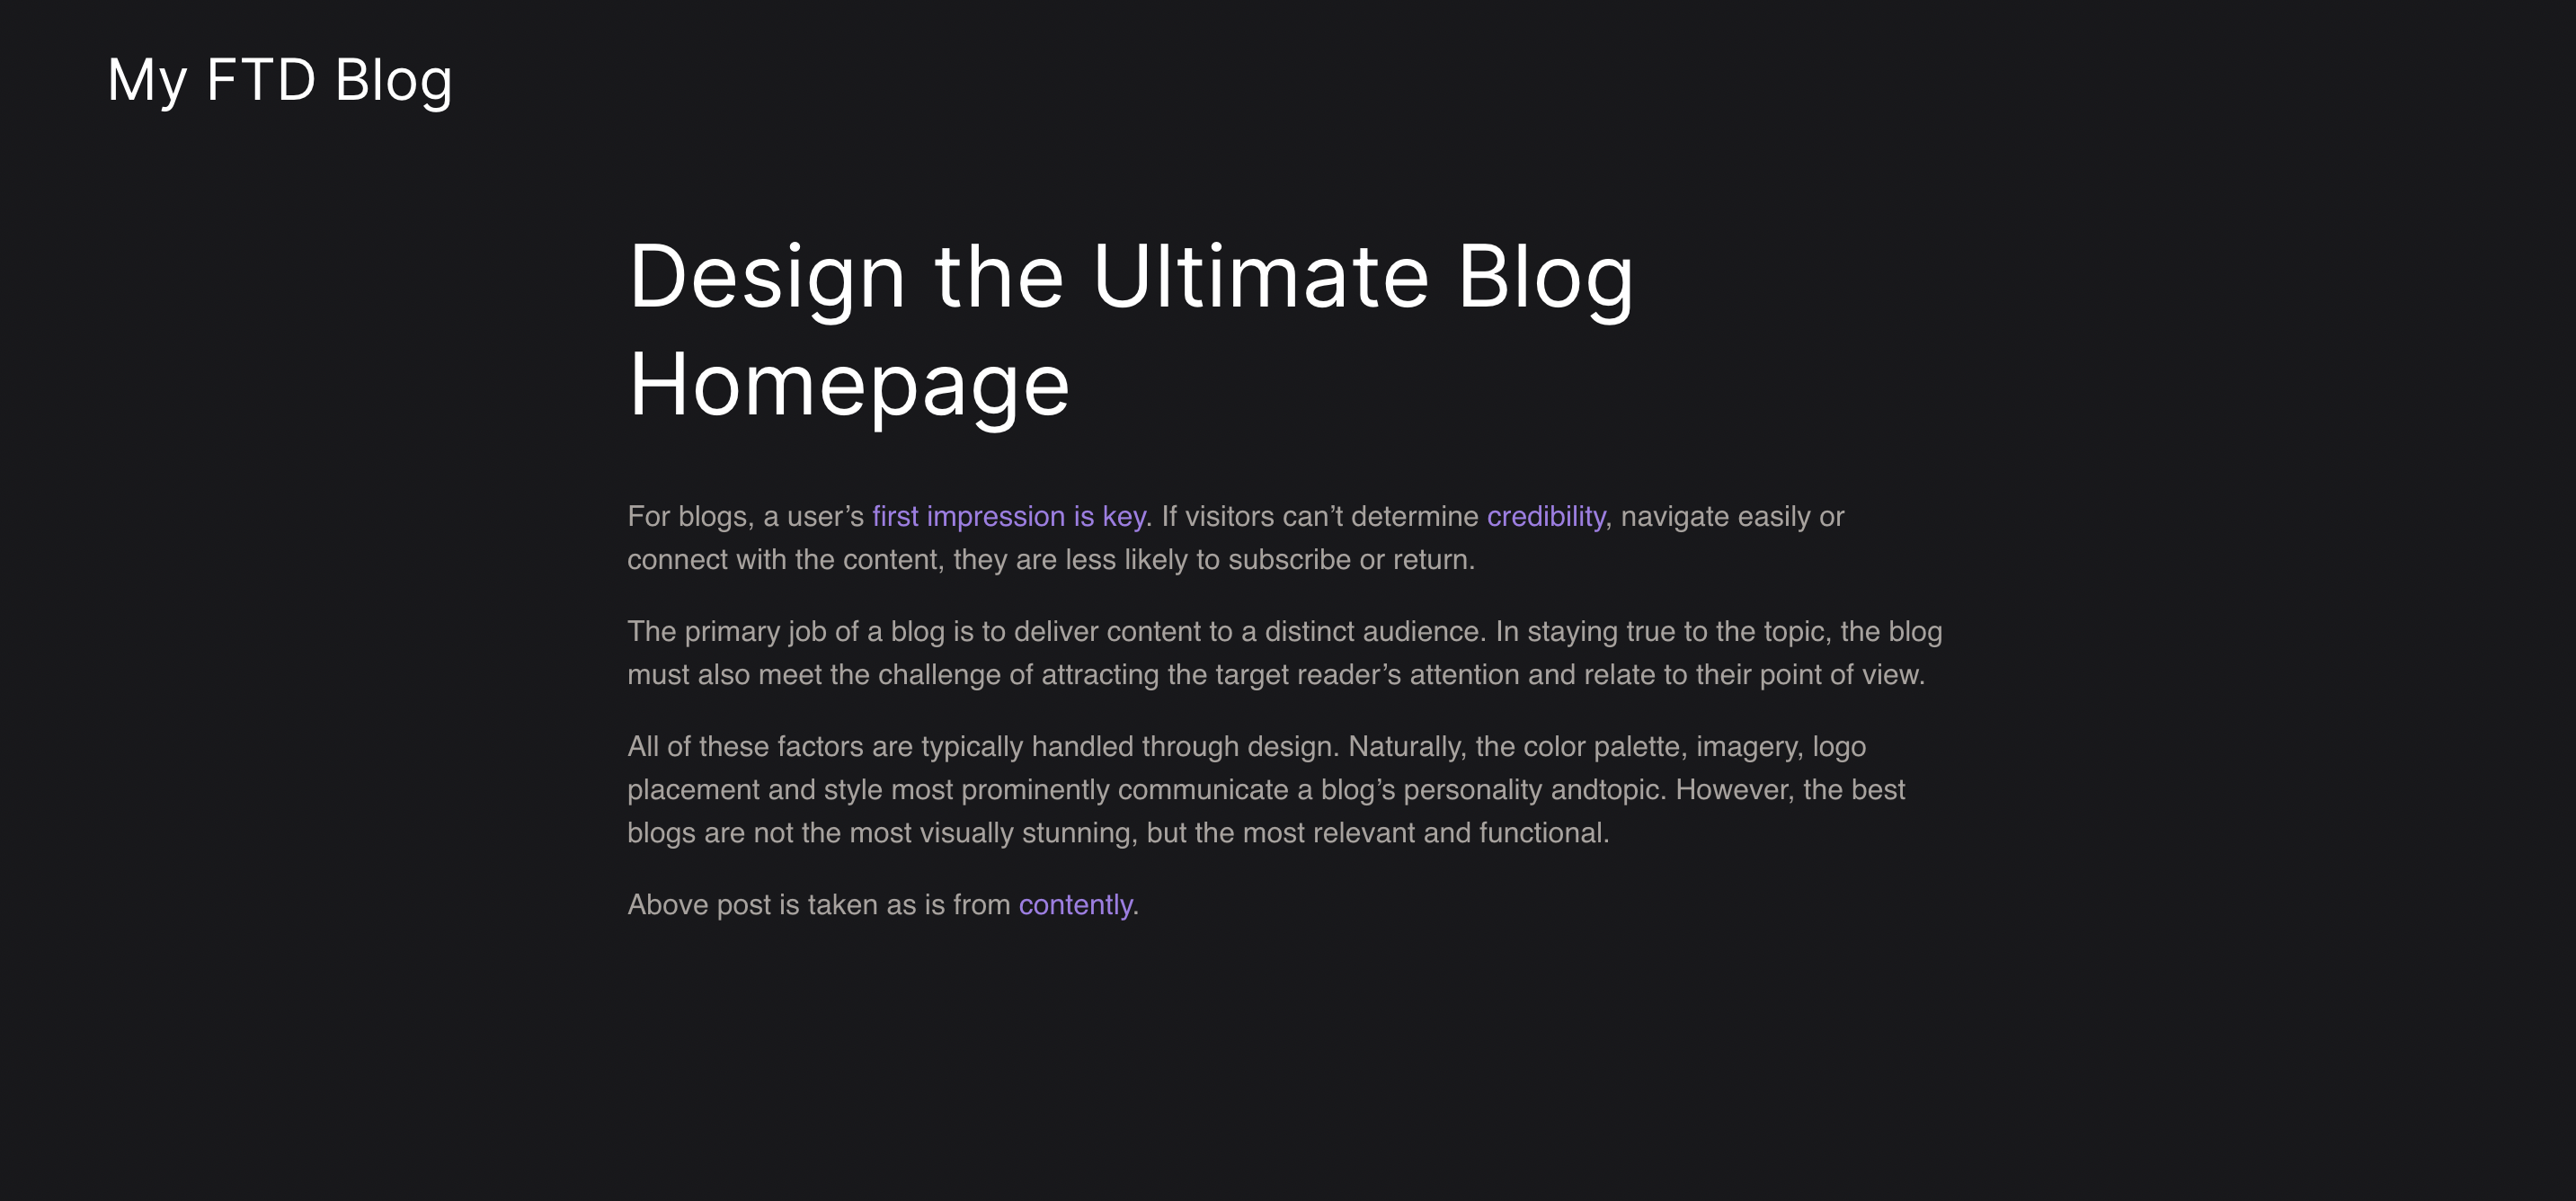
Click on your FTD website url e.g. https://gsalunke.github.io/my-ftd-blog/ to see updated changes of index.ftd file on your website homepage.
index.ftd with homepage contentHow to create a new page into FTD website?On your GitHub repository home, click on Add file button dropdown. It will show two options Create new file and Upload files. Click on Create new file to create new .ftd file.
FTD website?GitHub repository home, click on Add file button dropdown. It will show two options Create new file and Upload files. Click on Create new file to create new .ftd file.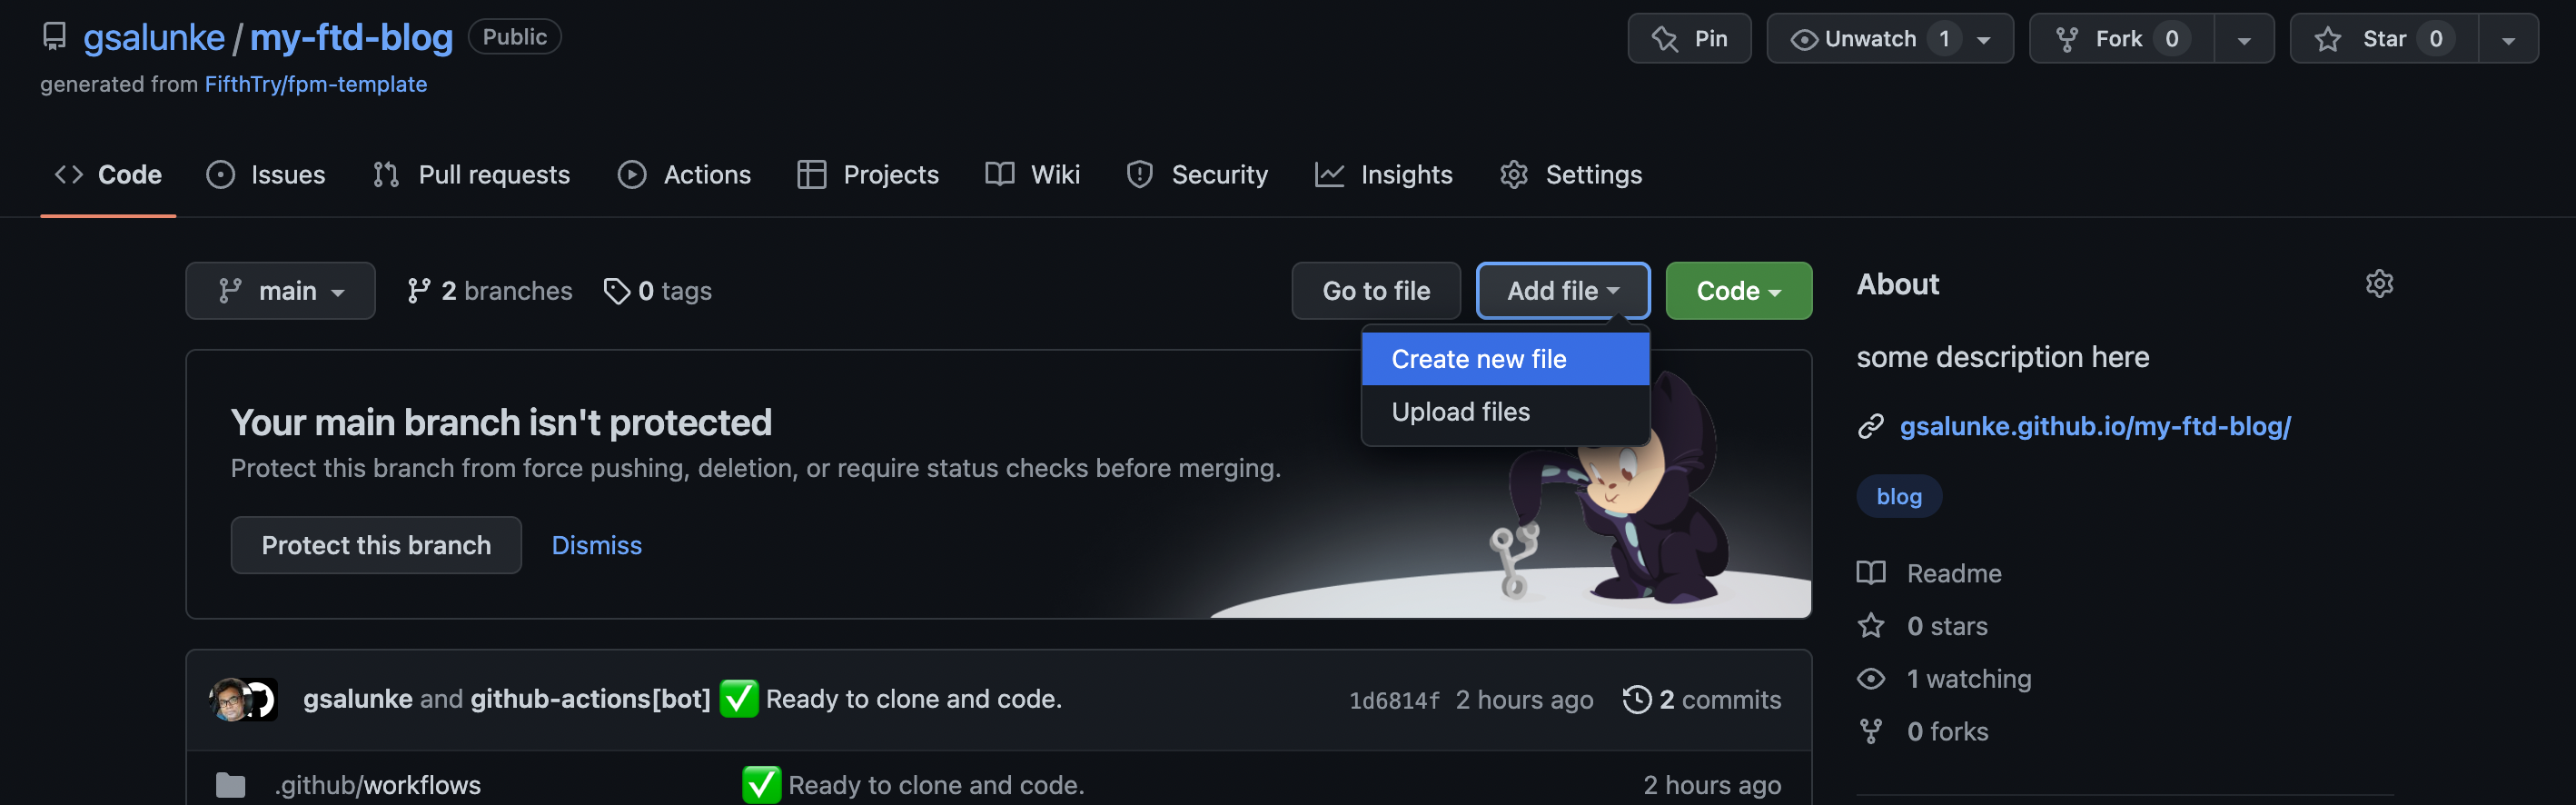
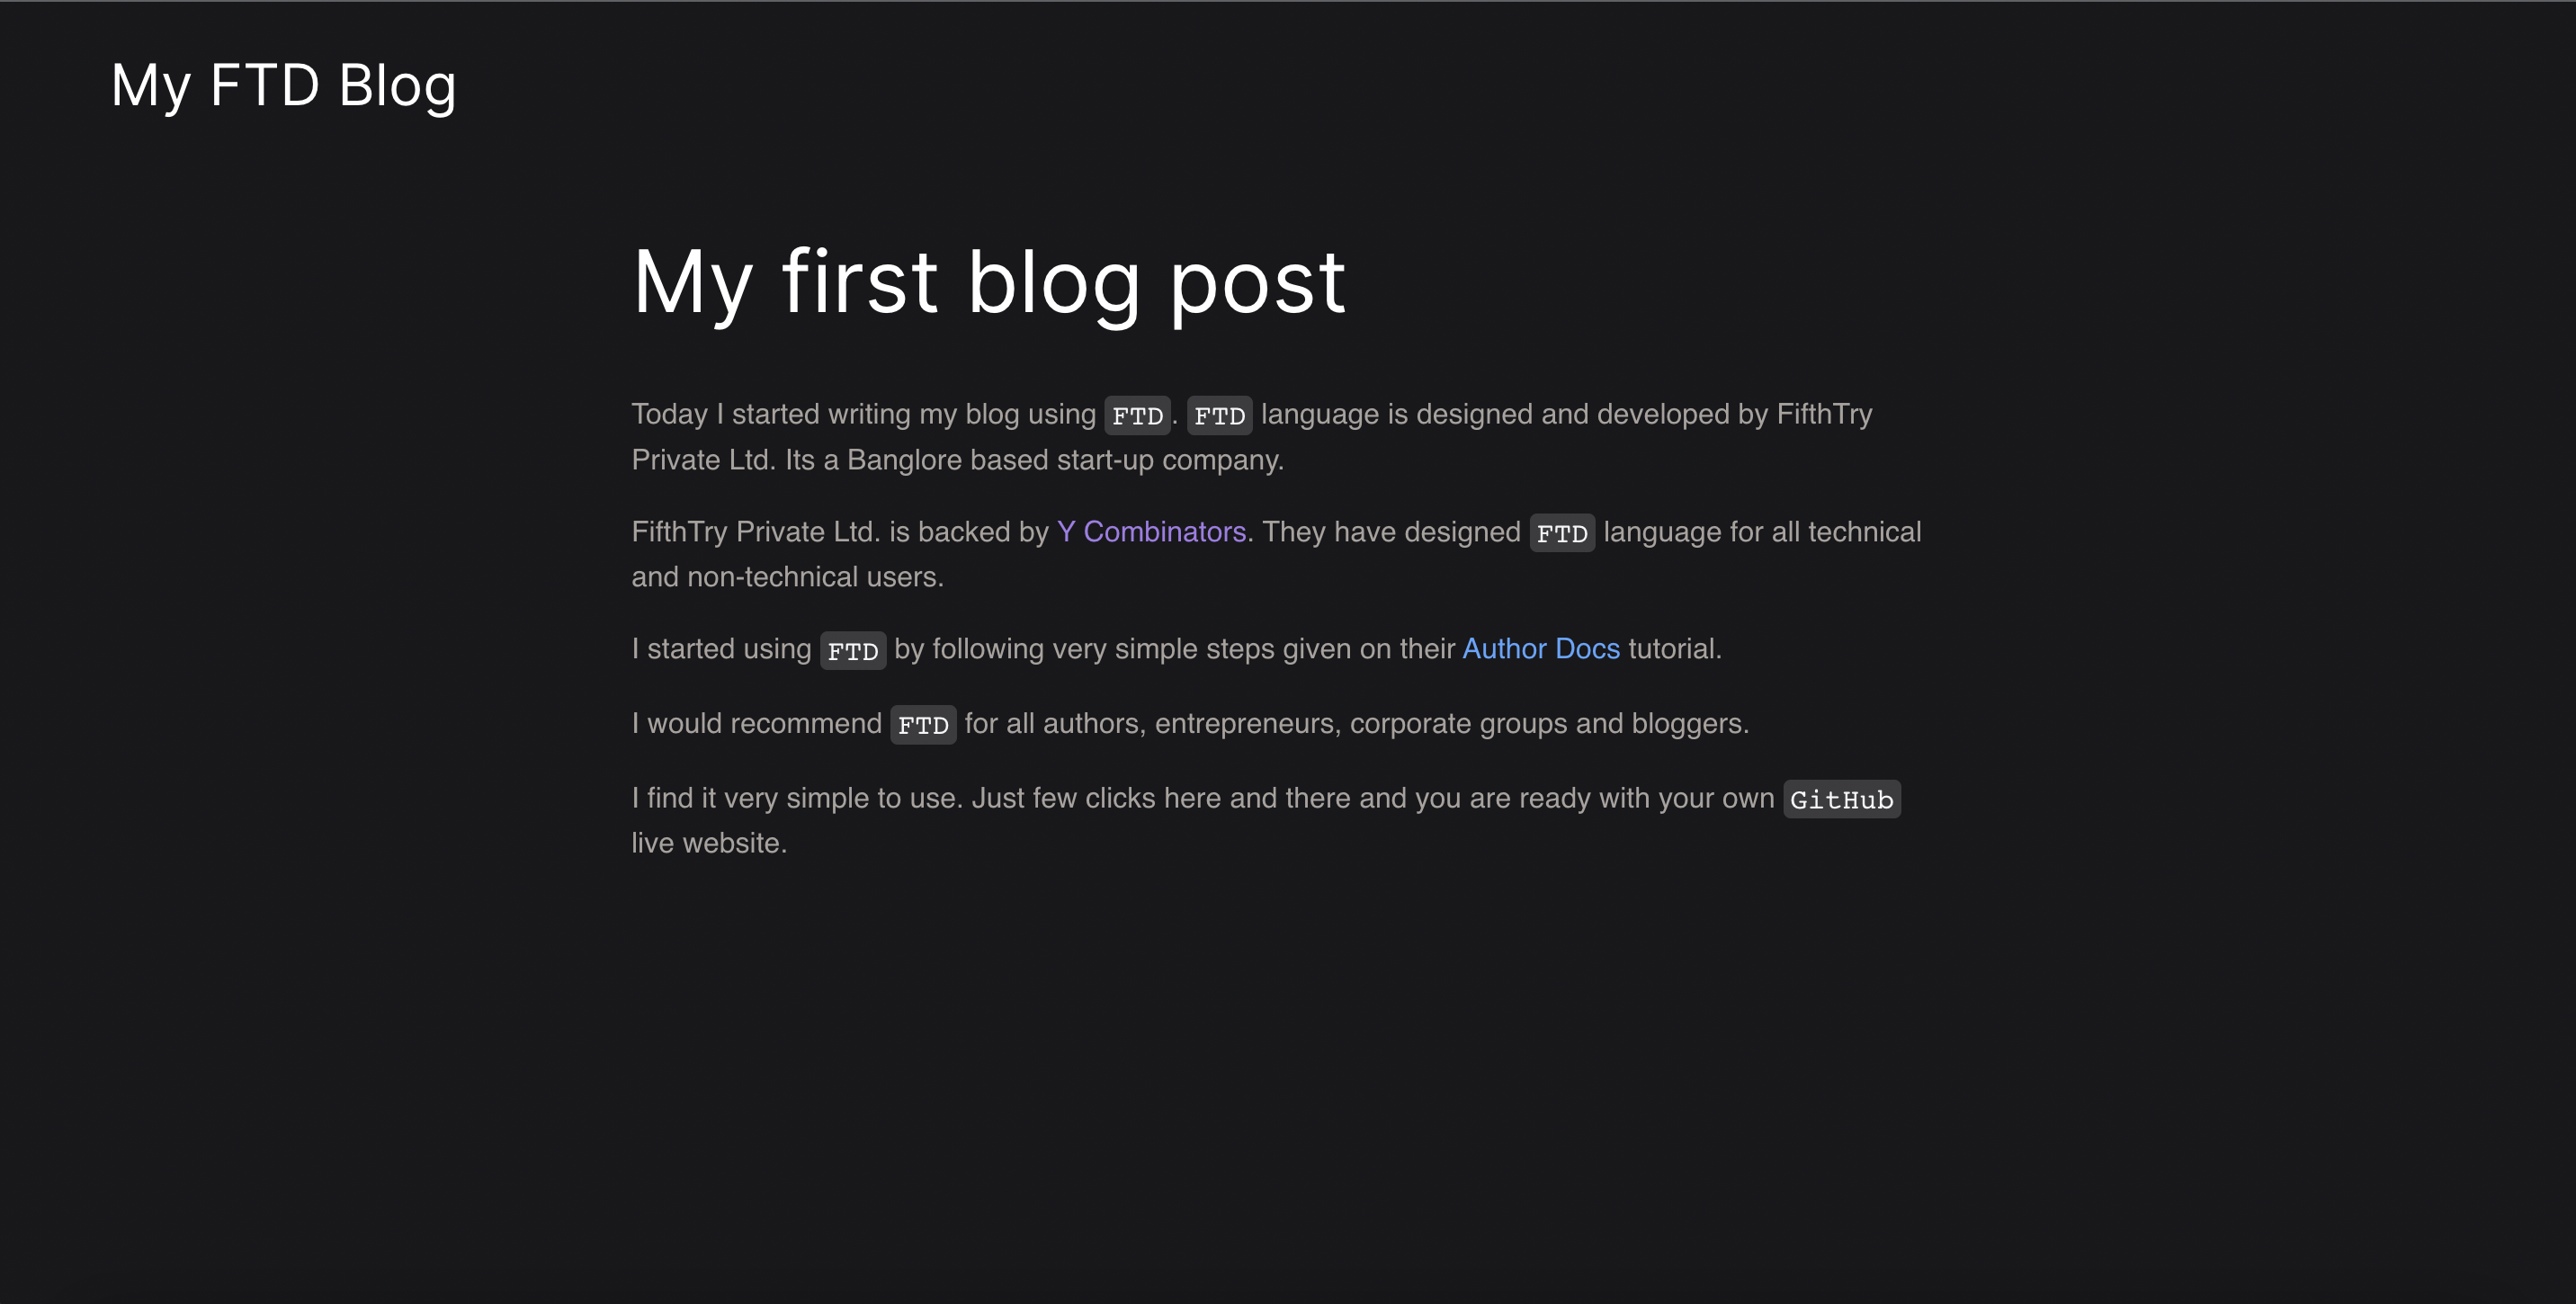
FTD fileCreate new file, GitHub will open live editor. Provide name of your first .ftd file into Name your file... input box. e.g. post.ftdFTD file e.g. post.ftd-- ds.page: My first blog post -- title of the post Today I started writing my blog using `FTD`. `FTD` language is designed and developed by FifthTry Private Ltd. Its a Banglore based start-up company. FifthTry Private Ltd. is backed by [Y Combinators](https://www.fifthtry.com/). They have designed `FTD` language for all technical and non-technical users. I started using `FTD` by following very simple steps given on their [Author Docs](https://fifthtry.github.io/doc-site/docs) tutorial. I would recommend `FTD` for all authors, entrepreneurs, corporate groups and bloggers. I find it very simple to use. Just few clicks here and there and you are ready with your own `GitHub` live website.
Commiting my first post.ftdBelow image shows how to Commit your first post.ftd file
post.ftdCommit your first post.ftd file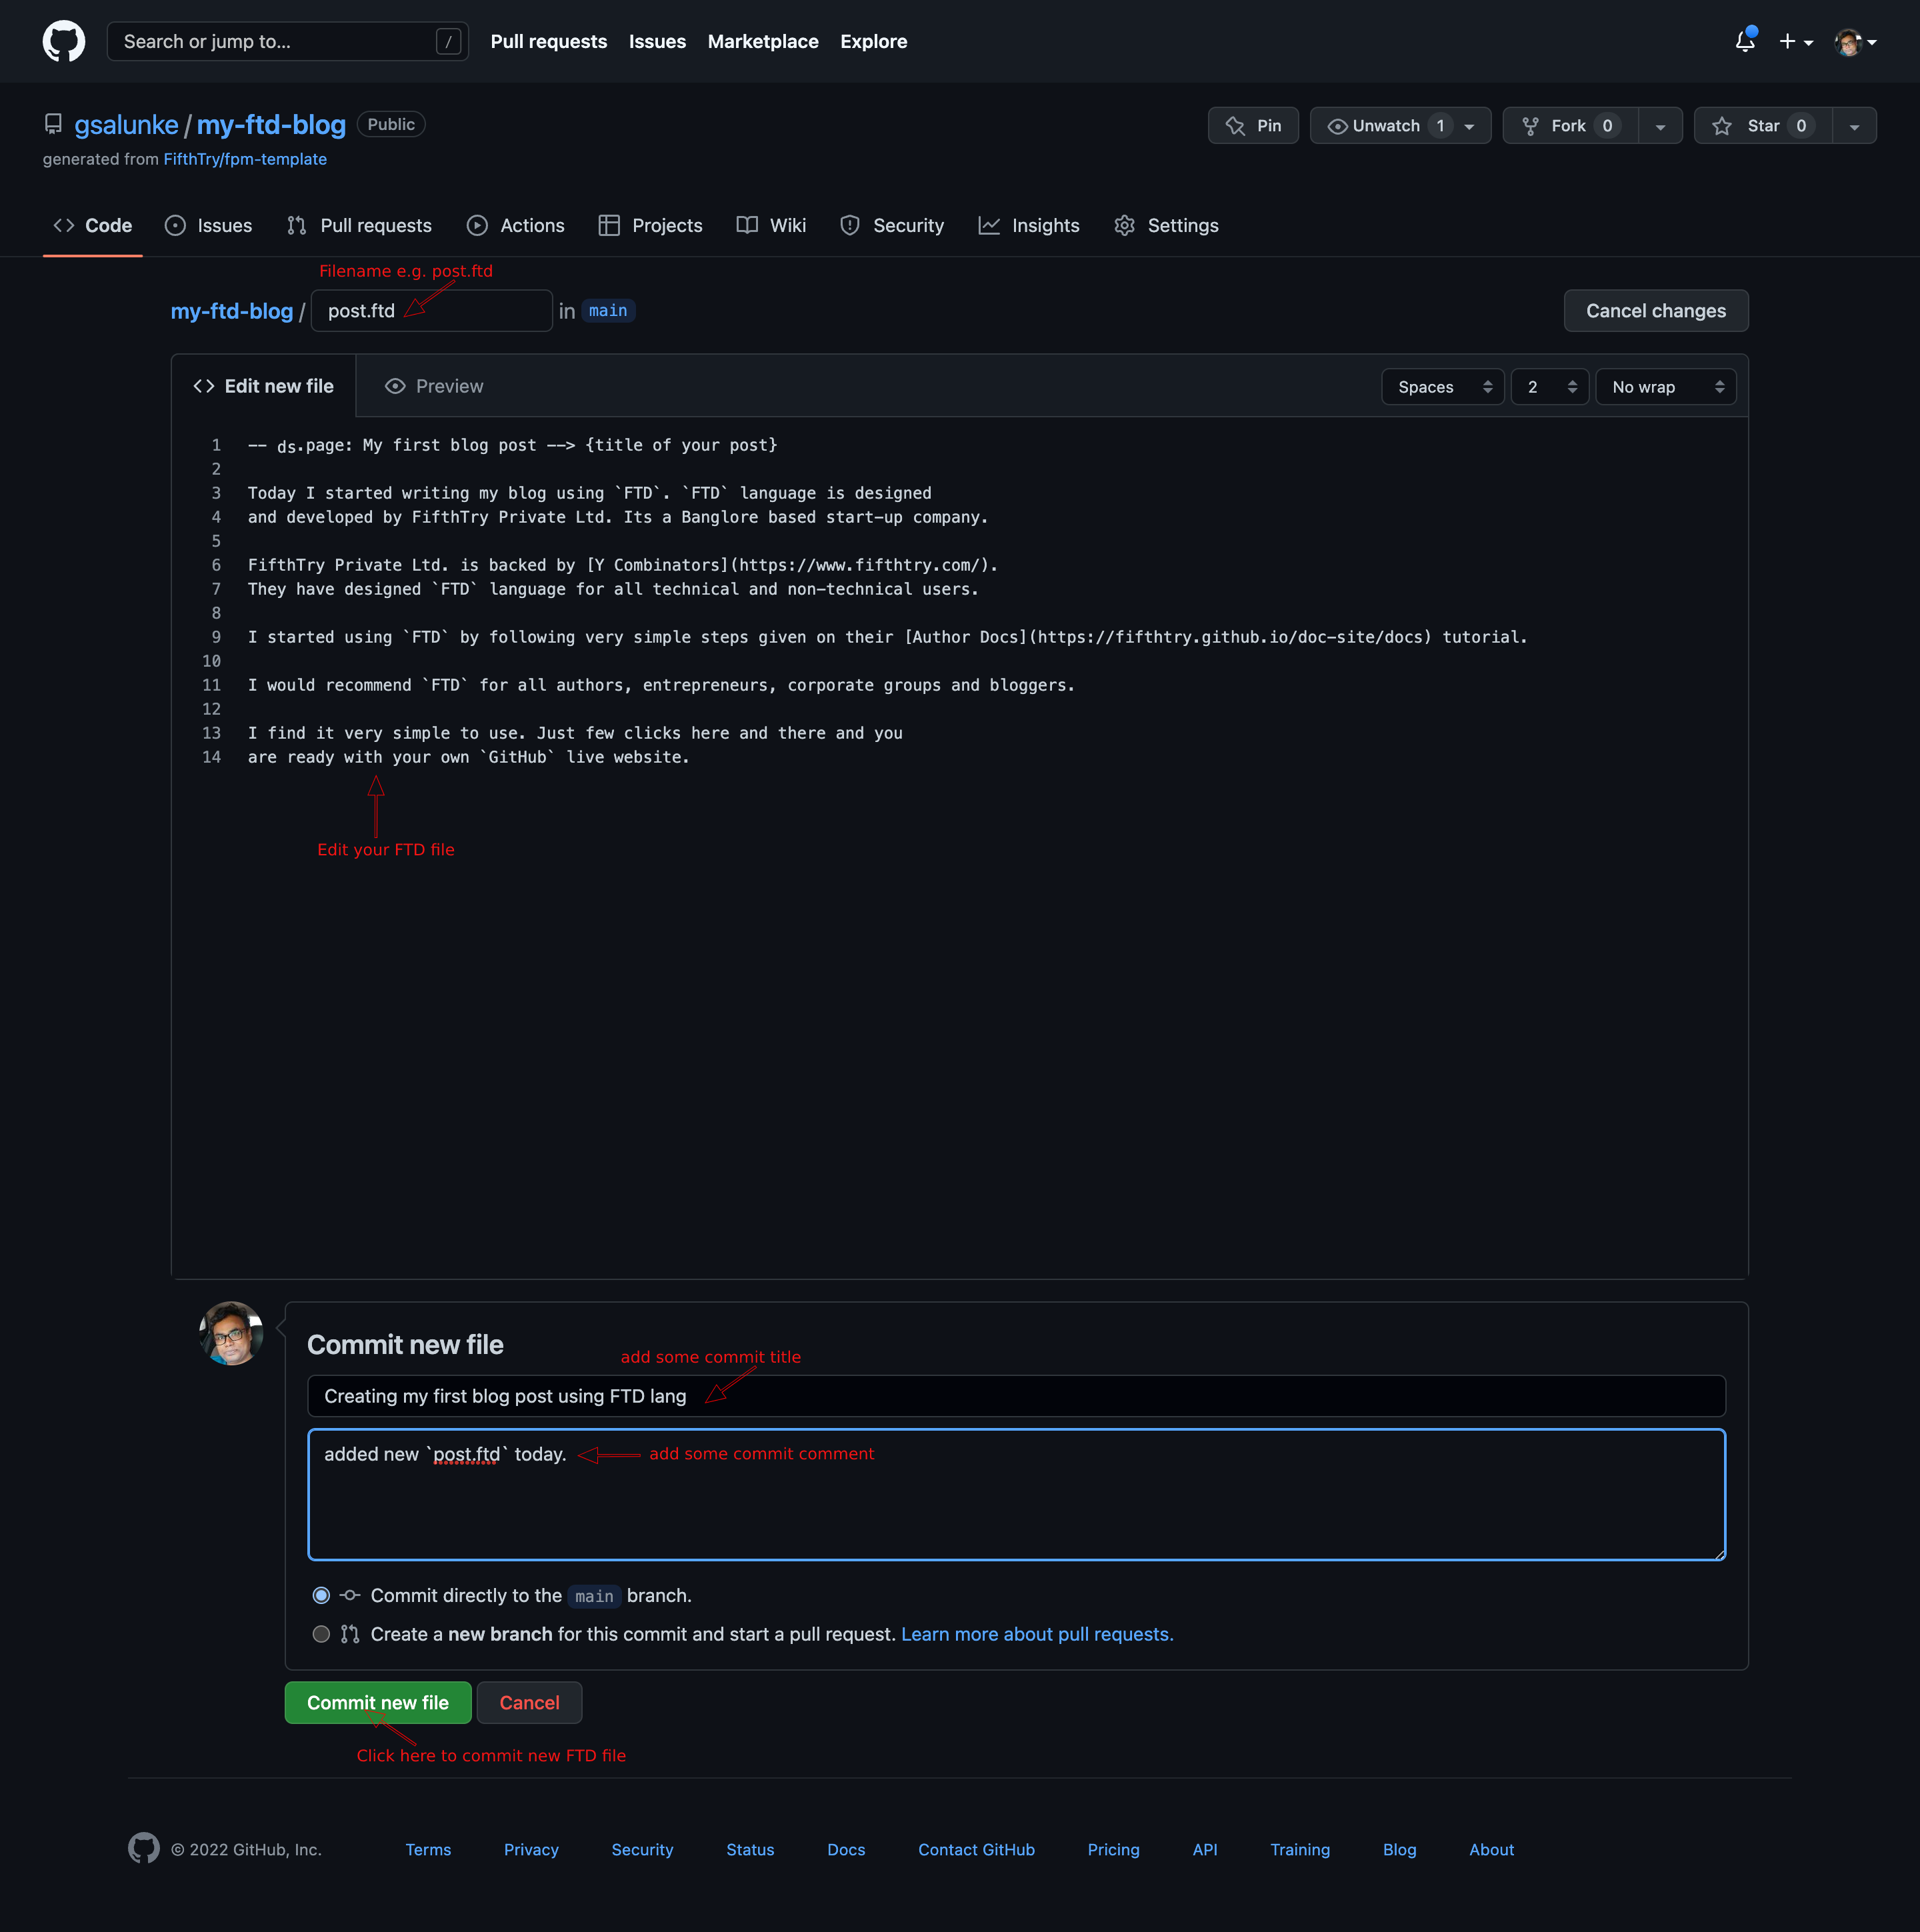
FTD blog postOnce you click on Commit new file button. GitHub will add your post.ftd file into your repository.
FPM auto deployment job will run and your first post.ftd file will be deployed on live automatically by our FPM builder.
To cross-check if pages build and deployment workflow ran successfully. Click on Actions tab.
pages build and deployment workflow should run successfullyOnce you see green tick on pages build and deployment, it means your post.ftd file is successfully deployed on live website.
To see it live add post into your website url. e.g. https://gsalunke.github.io/my-ftd-blog/post/.
Creating config.ftd & changing ds.site-name with My FTD BlogDefault value of ds.site-name variable is LOGO. Let’s change it with your blog name. e.g. here we will change LOGO site-name with My FTD Blog.
To change default value of site-name you need to add config.ftd file into FPM folder.
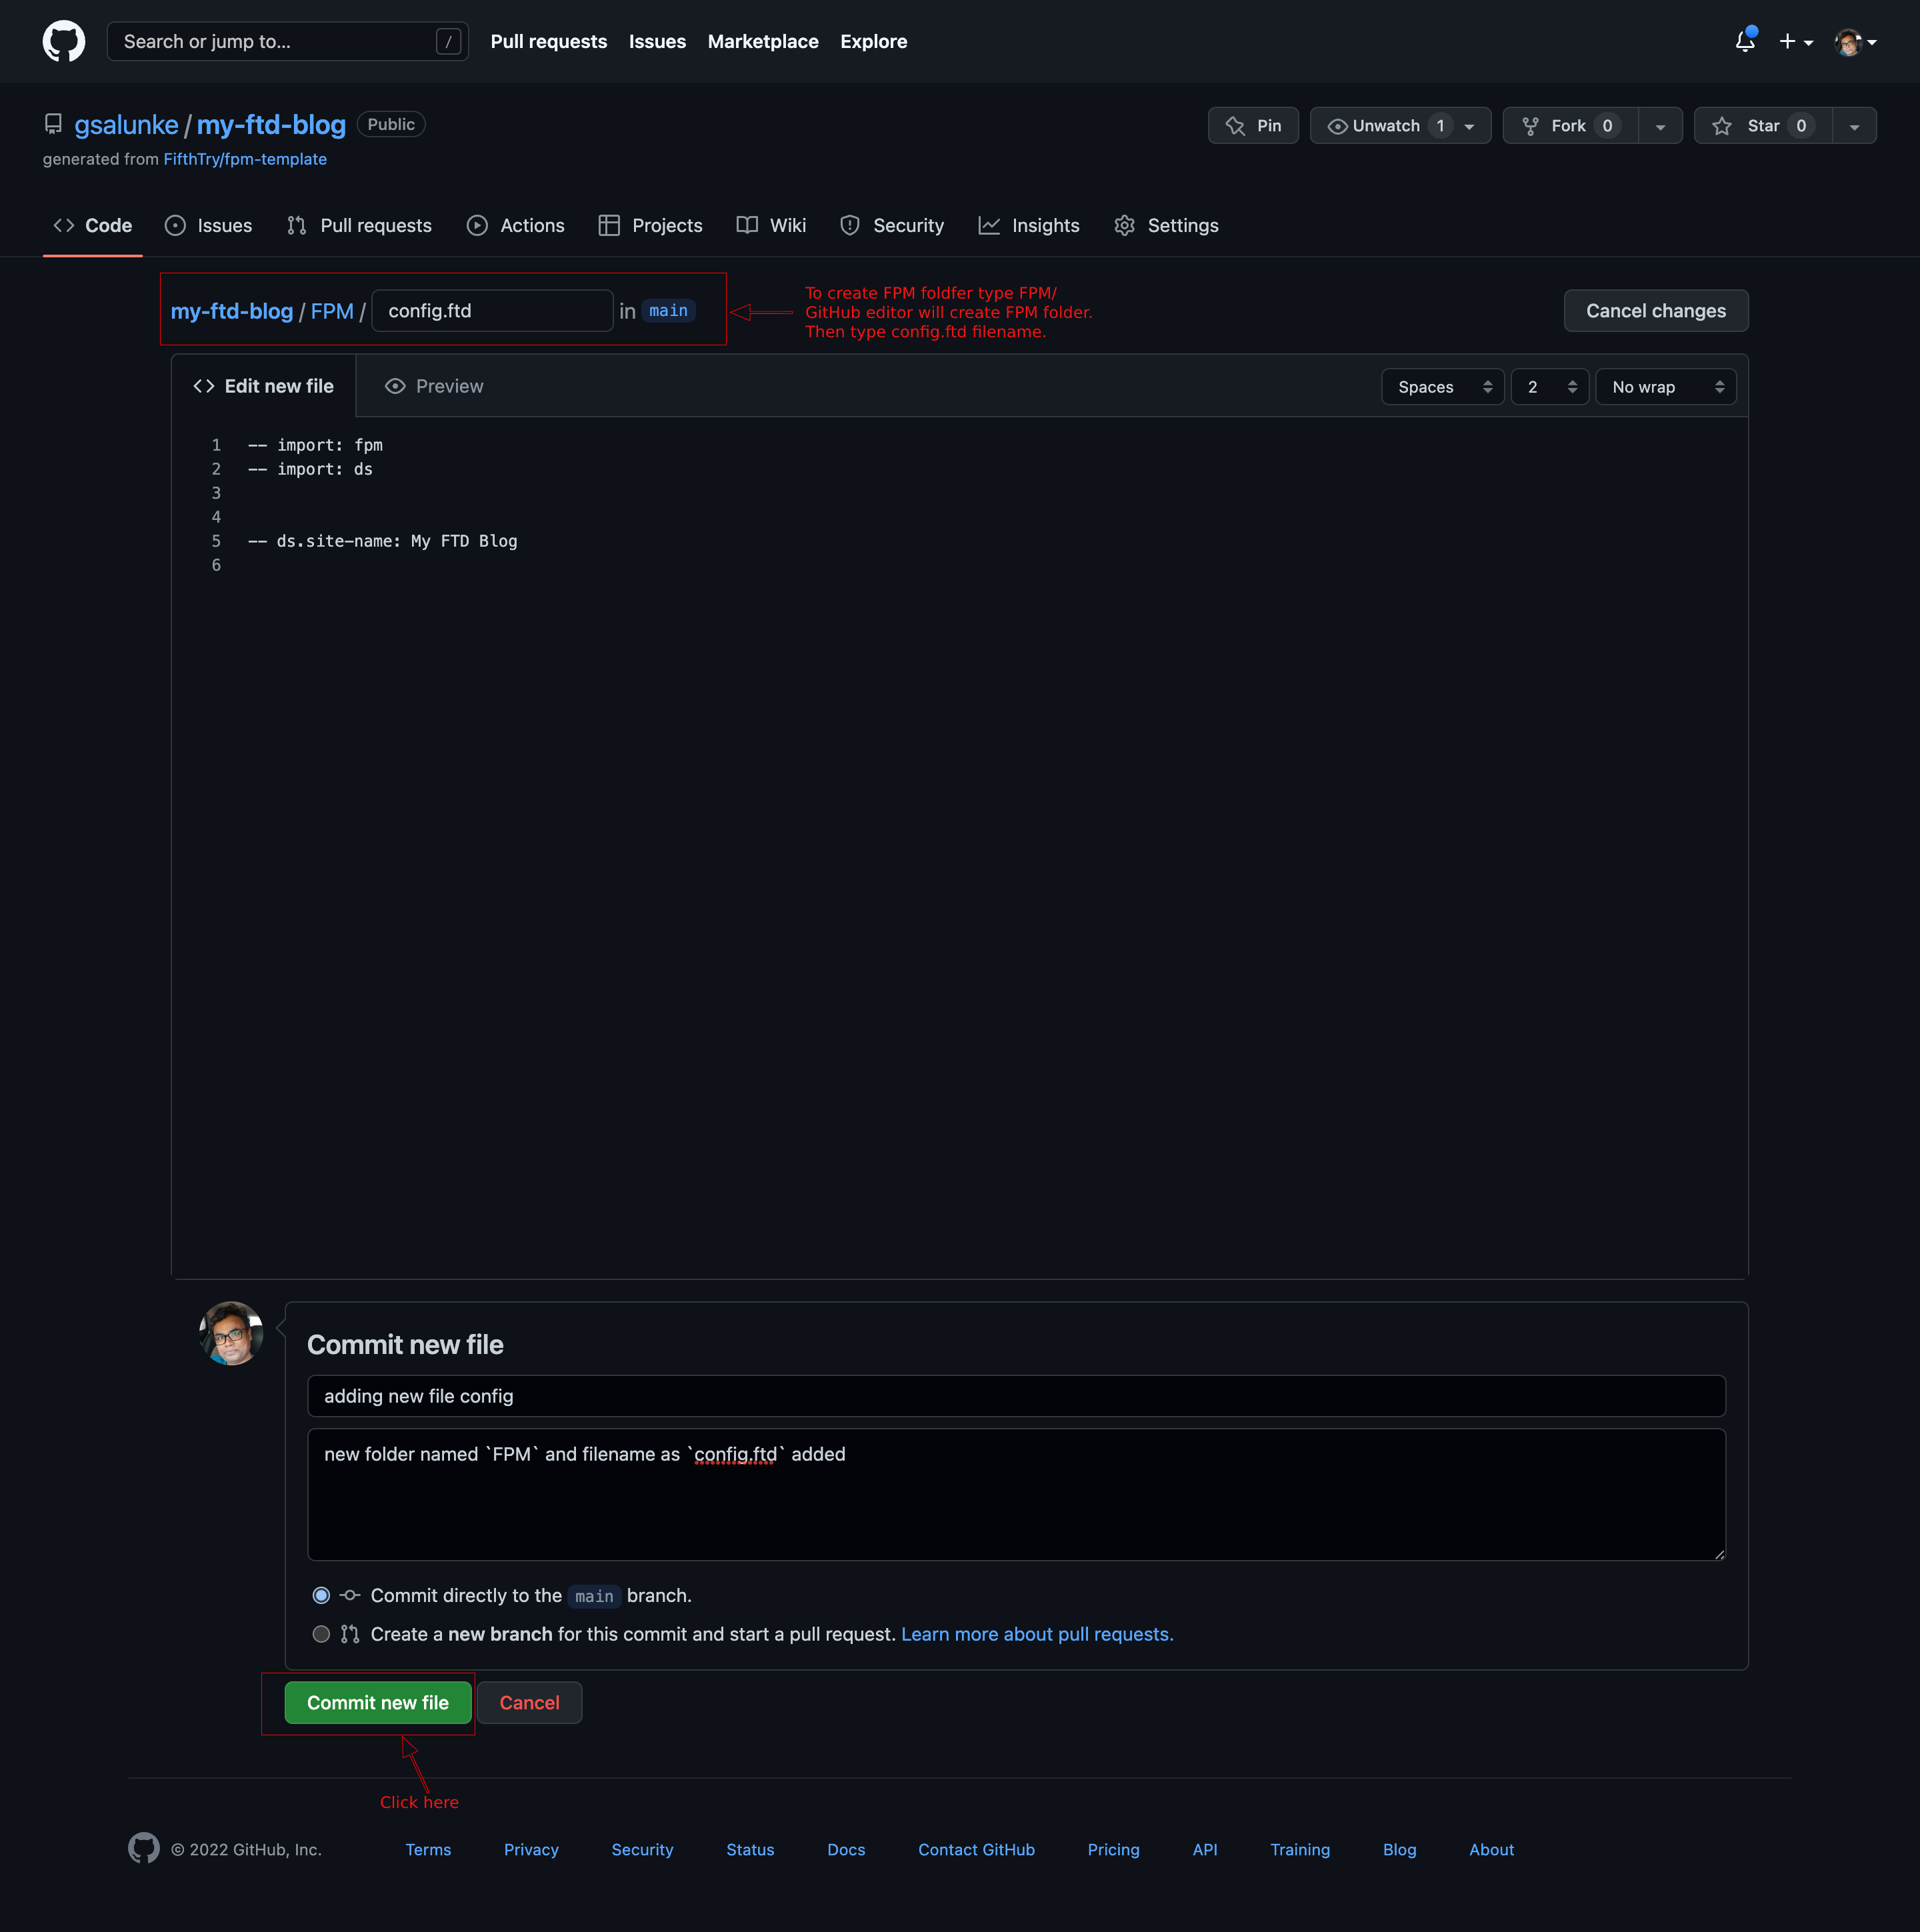
To create config.ftd file follow same steps we mentioned in How to create a new page into FTD website? to Create new file. As mentioned above config.ftd should be created inside FPM folder. So to create new folder simply type folder-name into Name your file... input box followed by / GitHub will consider FPM/ as folder and it will create folder named FPM into route directory of your FTD repository.
Now provide file name as config.ftd and add below code into config.ftd file using GitHub live editor.
config.ftd & changing ds.site-name with My FTD BlogDefault value of ds.site-name variable is LOGO. Let’s change it with your blog name. e.g. here we will change LOGO site-name with My FTD Blog.
To change default value of site-name you need to add config.ftd file into FPM folder.
To create config.ftd file follow same steps we mentioned in How to create a new page into FTD website? to Create new file. As mentioned above config.ftd should be created inside FPM folder. So to create new folder simply type folder-name into Name your file... input box followed by / GitHub will consider FPM/ as folder and it will create folder named FPM into route directory of your FTD repository.
Now provide file name as config.ftd and add below code into config.ftd file using GitHub live editor.
config.ftd file into My FTD Blog-- import: fpm -- import: ds -- ds.site-name: My FTD Blog
FPM/config.ftd fileOnce you commit FPM/config.ftd file, FPM builder will start building newly added files.
Let FPM build finish up pages-build-and-deployment build process.
Once you see green tick on pages build and deployment, it means your config.ftd file is successfully deployed on live website.
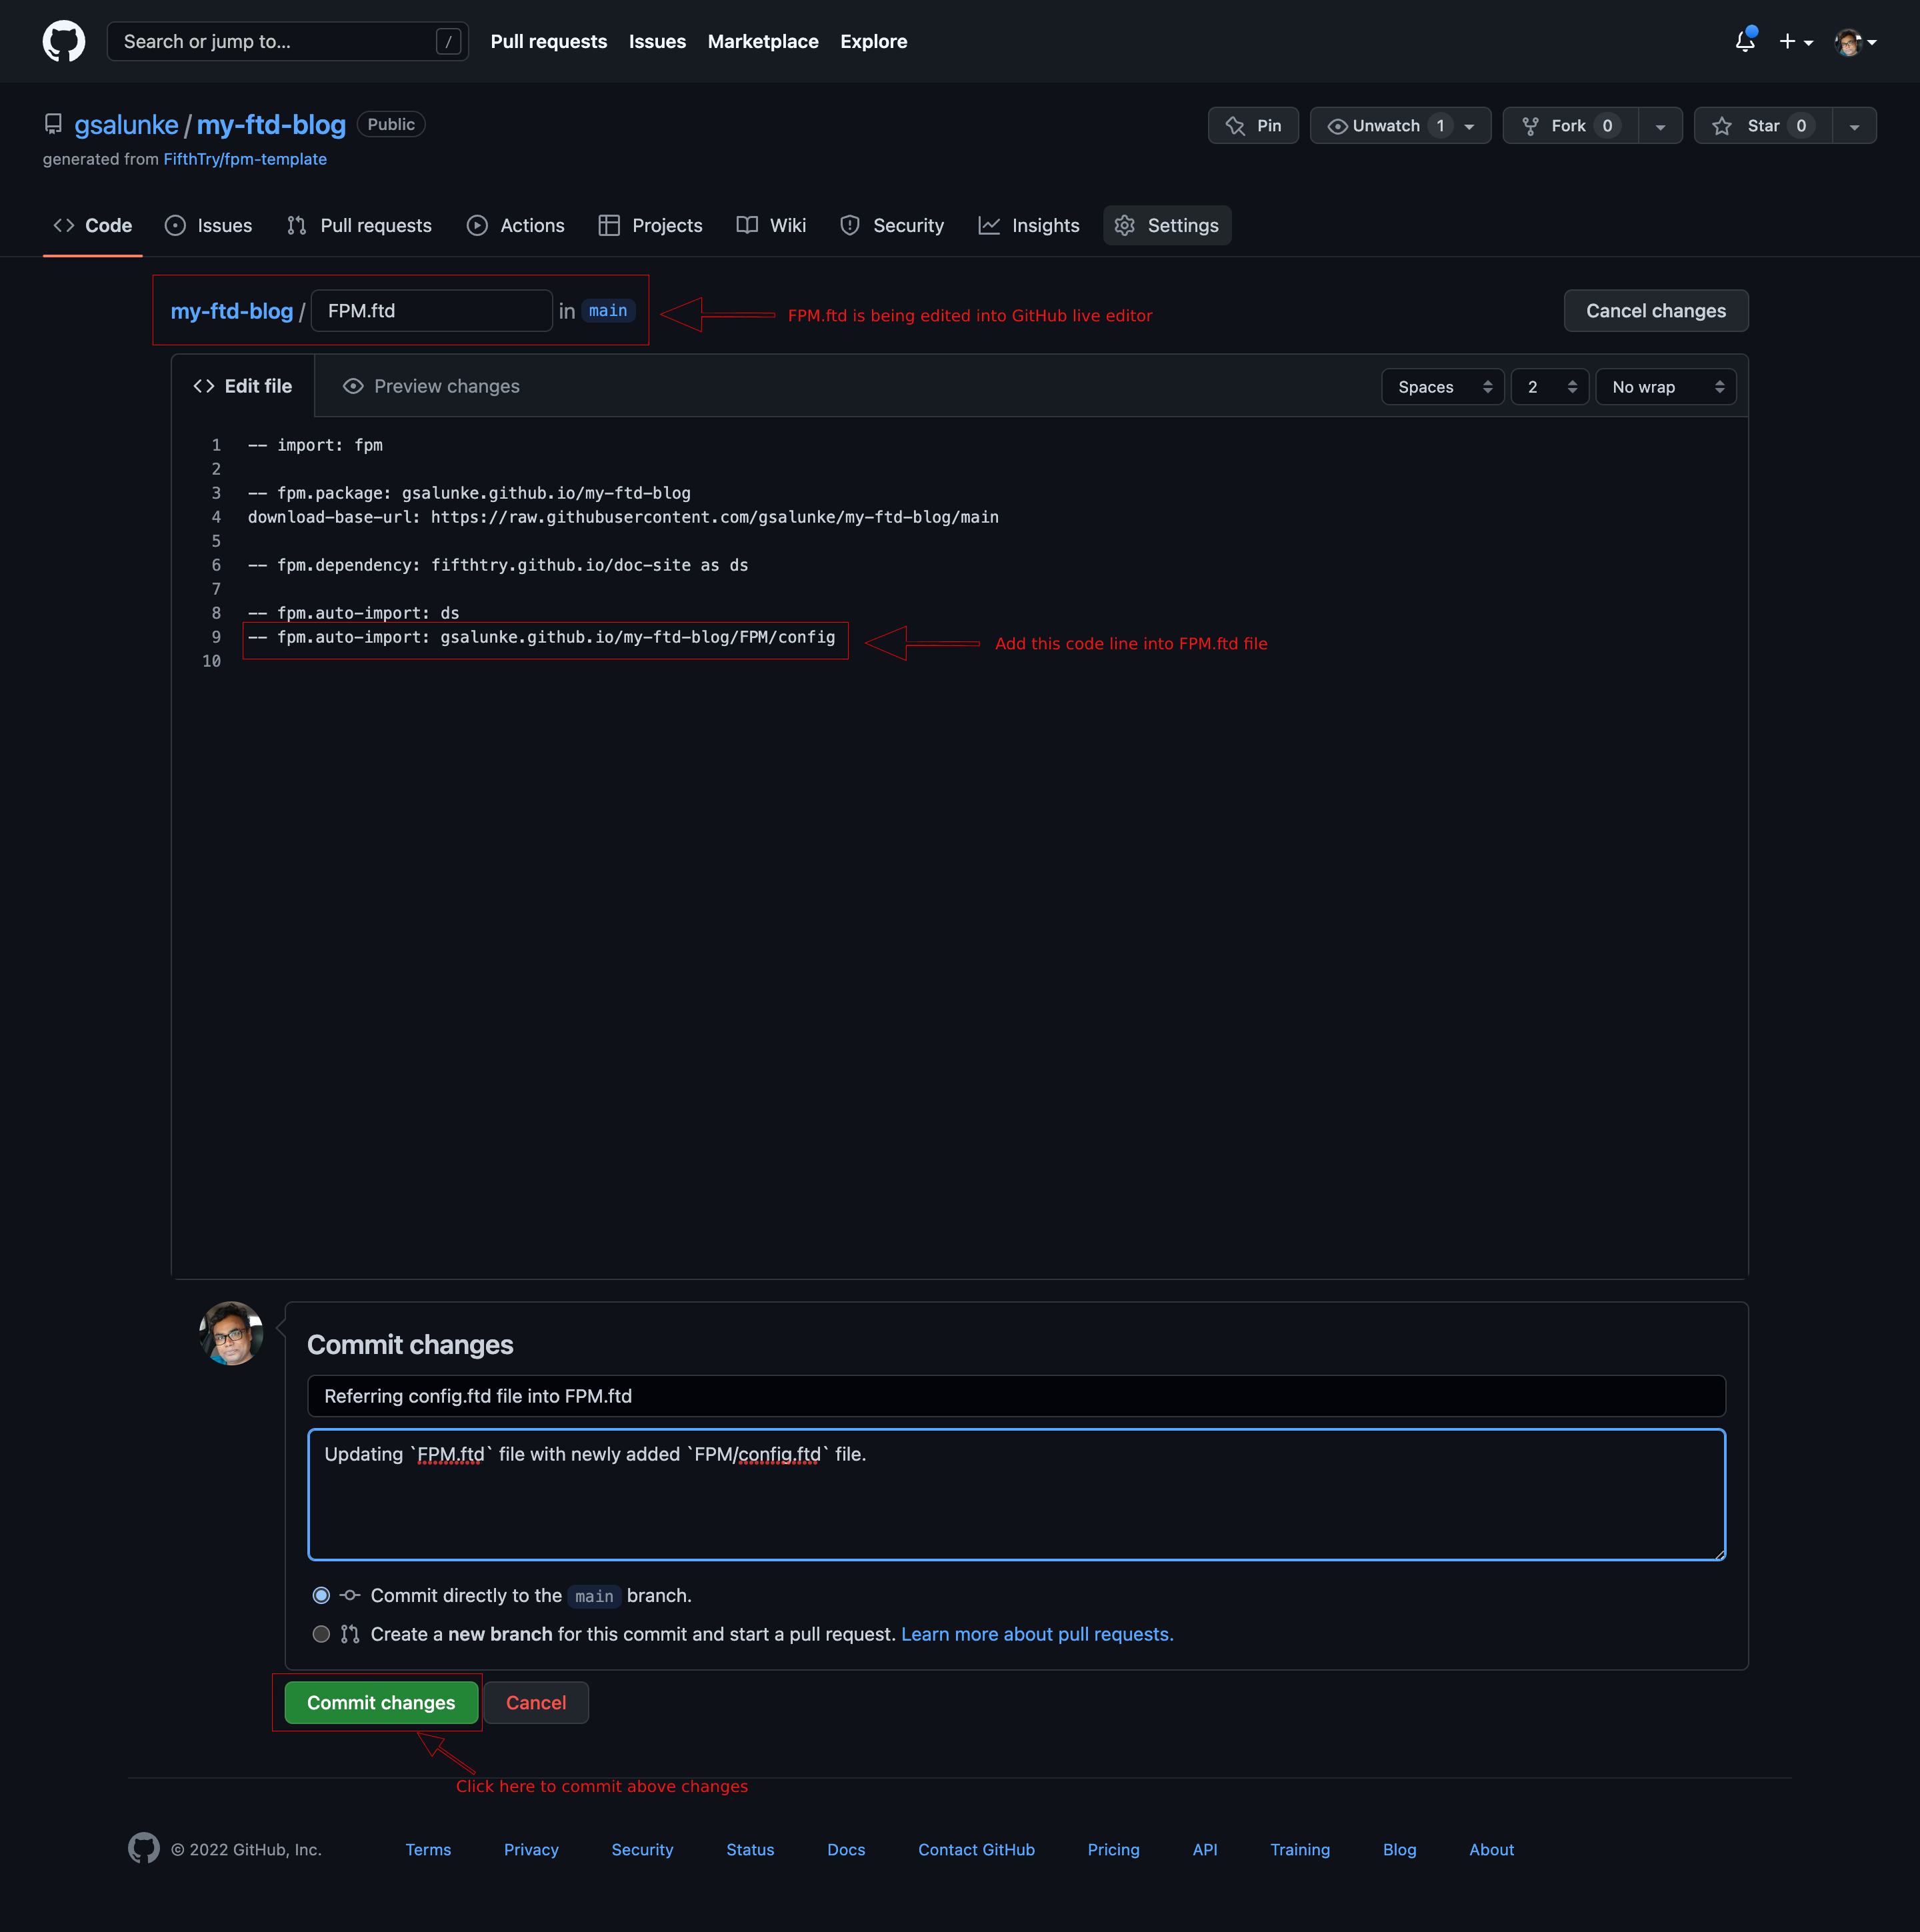
Udating config.ftd into FPM.ftd fileOur newly created FTD configuration file should be added into FPM.ftd file, otherwise the configurations we mentioned FPM/config.ftd file won’t work.
To refer config.ftd file inside FPM.ftd click on FPM.ftd file. GitHub will open this file as non-editable.
To edit FPM.ftd file click on edit icon. Once you click on edit icon FPM.ftd file will be opned for editing into GitHub live editor.
Add below code into your FPM.ftd file.
config.ftd into FPM.ftd fileOur newly created FTD configuration file should be added into FPM.ftd file, otherwise the configurations we mentioned FPM/config.ftd file won’t work.
To refer config.ftd file inside FPM.ftd click on FPM.ftd file. GitHub will open this file as non-editable.
To edit FPM.ftd file click on edit icon. Once you click on edit icon FPM.ftd file will be opned for editing into GitHub live editor.
Add below code into your FPM.ftd file.
FPM.ftd file with config.ftd-- fpm.auto-import: gsalunke.github.io/my-ftd-blog/FPM/config
In above example code we have added config.ftd file into gsalunke.github.io/my-ftd-blog/
So, while linking we should provide full path of config.ftd file, as mentioned in above example.
Follow same steps commiting-my-first-post-ftd to commit FPM.ftd file.
FPM/config.ftd into FPM.ftd fileOnce you click on Commit changes button, FPM builder will start building these changes and deploy them on live. Ref. pages-build-and-deployment
Visit your FTD website, newly added site-name My FTD Blog will appear instead of default LOGO site name.
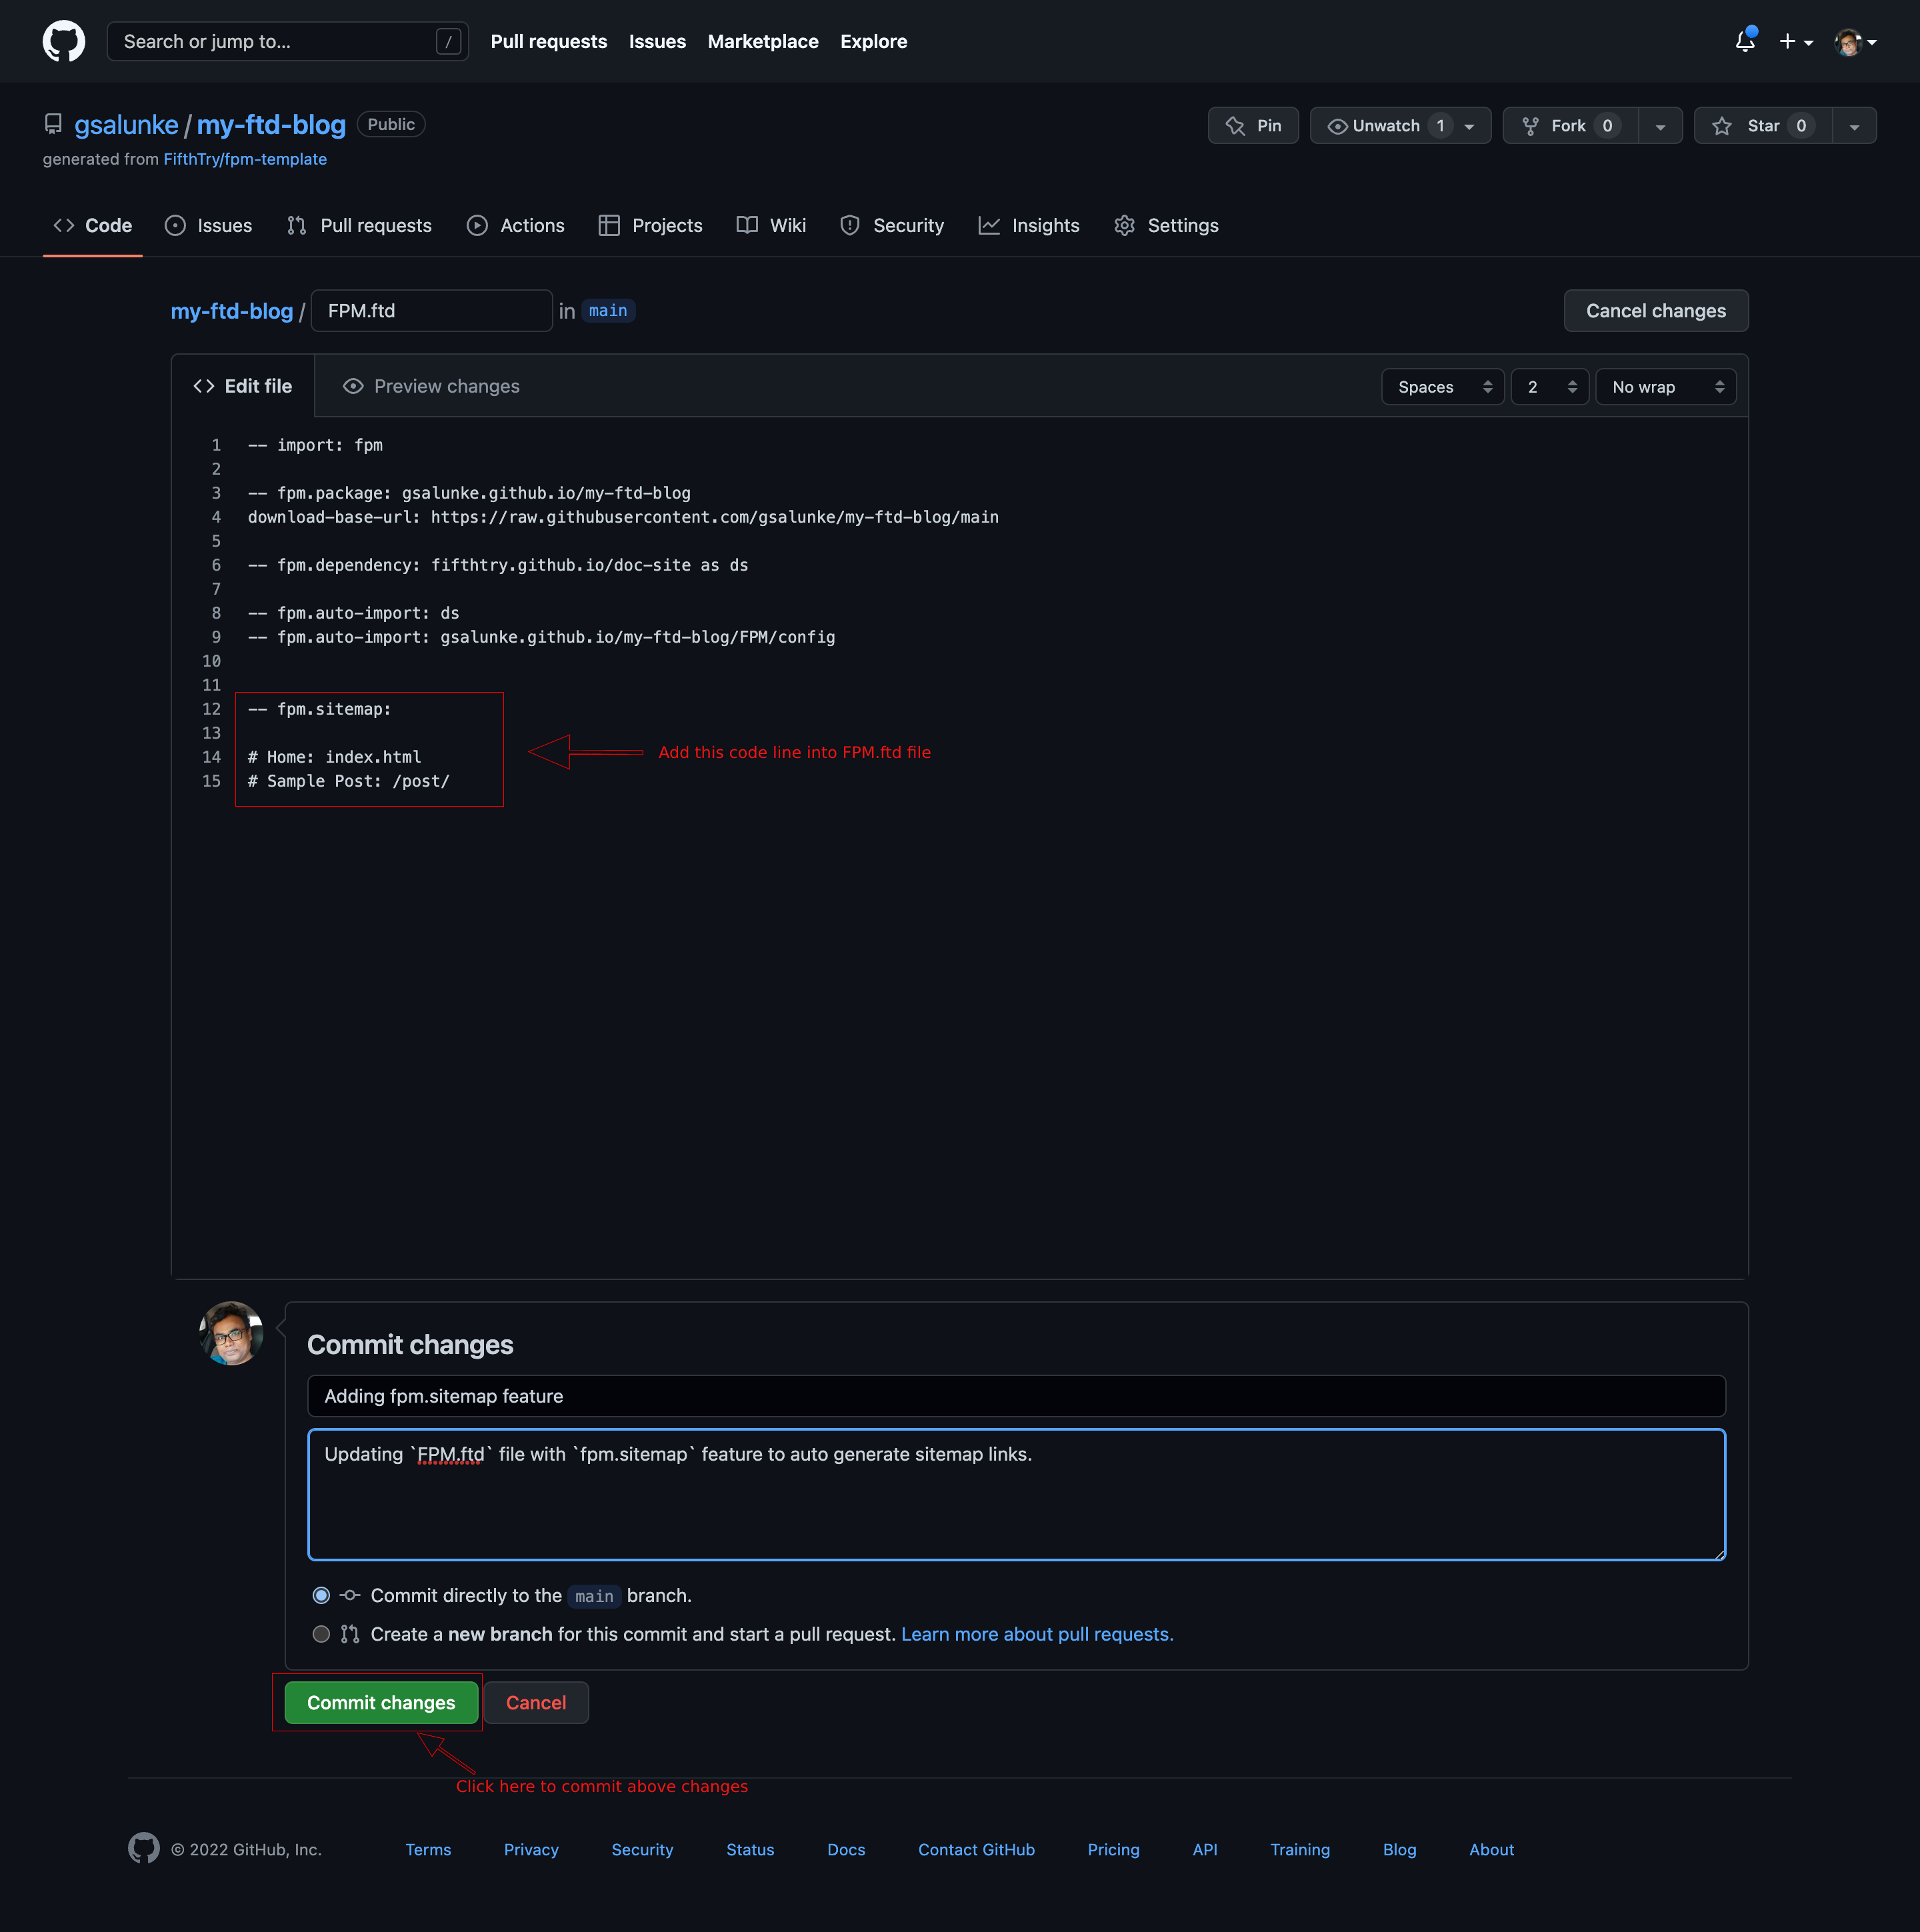
My FTD Blog site name from FPM/config.ftdUsing fpm.sitemap feature for sections in headerFifthTry have developed fpm.sitemap for you. Using fpm.sitemap feature you can add sections and sub-sections into header.
To use fpm.sitemap feature, we need to edit your FPM.ftd file and add sections, sub-sections into it.
fpm.sitemap feature for sections in headerFifthTry have developed fpm.sitemap for you. Using fpm.sitemap feature you can add sections and sub-sections into header.
To use fpm.sitemap feature, we need to edit your FPM.ftd file and add sections, sub-sections into it.
fpm.sitemap example code:-- fpm.sitemap: # Home: index.html ## My Sub Section: /sub-section/ - Sidebar link: /toc-link/ - Sidebar sub-link: /toc-sublink/ # Sample Post: /post/
FPM.ftd file and commit it. FPM will auto generate sitemap for your FTD website.Let’s understand above code snippet:# Home: index.html : # single hash treated as a section
Home link will be shown as primary section inside header.
## My Sub Section: /sub-section/ : ## double hash treated as a sub-section
My Sub Section link will be shown into Home page as secondary section below header.
- Sidebar link: /toc-link/ : - dash treated as toc-link
Sidebar link will be shown inside sidebar as table of contents link.
- Sidebar sub-link: /toc-sublink/ : indented - dash treated as toc-sub-link
Sidebar sub-link will be shown as sub-link to Sidebar link indented 10px to it.
# Sample Post: /post/ : # single hash treated as a section
Sample Post link will be shown as section inside header.
Each section or sub-section link will be shown in green color when its active.
RULE:
Whilte adding links to fpm.sitemap /link-url/ should be a .ftd file. e.g. if you are adding link as /my-link/ then in your route folder my-link.ftd file should be present. Similarly if you are adding a link from folder e.g. /directory/folder-link then folder named directory should be present in route directory. And inside directory folder folder-link.ftd file should be present.
For example refer our fpm.dev or ftd.dev websites to learn more about sitemap linking.
# Home: index.html : # single hash treated as a section
Home link will be shown as primary section inside header.
## My Sub Section: /sub-section/ : ## double hash treated as a sub-section
My Sub Section link will be shown into Home page as secondary section below header.
- Sidebar link: /toc-link/ : - dash treated as toc-link
Sidebar link will be shown inside sidebar as table of contents link.
- Sidebar sub-link: /toc-sublink/ : indented - dash treated as toc-sub-link
Sidebar sub-link will be shown as sub-link to Sidebar link indented 10px to it.
# Sample Post: /post/ : # single hash treated as a section
Sample Post link will be shown as section inside header.
Each section or sub-section link will be shown in green color when its active.
RULE:
Whilte adding links to fpm.sitemap /link-url/ should be a .ftd file. e.g. if you are adding link as /my-link/ then in your route folder my-link.ftd file should be present. Similarly if you are adding a link from folder e.g. /directory/folder-link then folder named directory should be present in route directory. And inside directory folder folder-link.ftd file should be present.
For example refer our fpm.dev or ftd.dev websites to learn more about sitemap linking.
FPM.ftd file with fpm.sitemap featureCommit changes button, FPM builder will start building these changes and deploy them on live. Ref. pages-build-and-deployment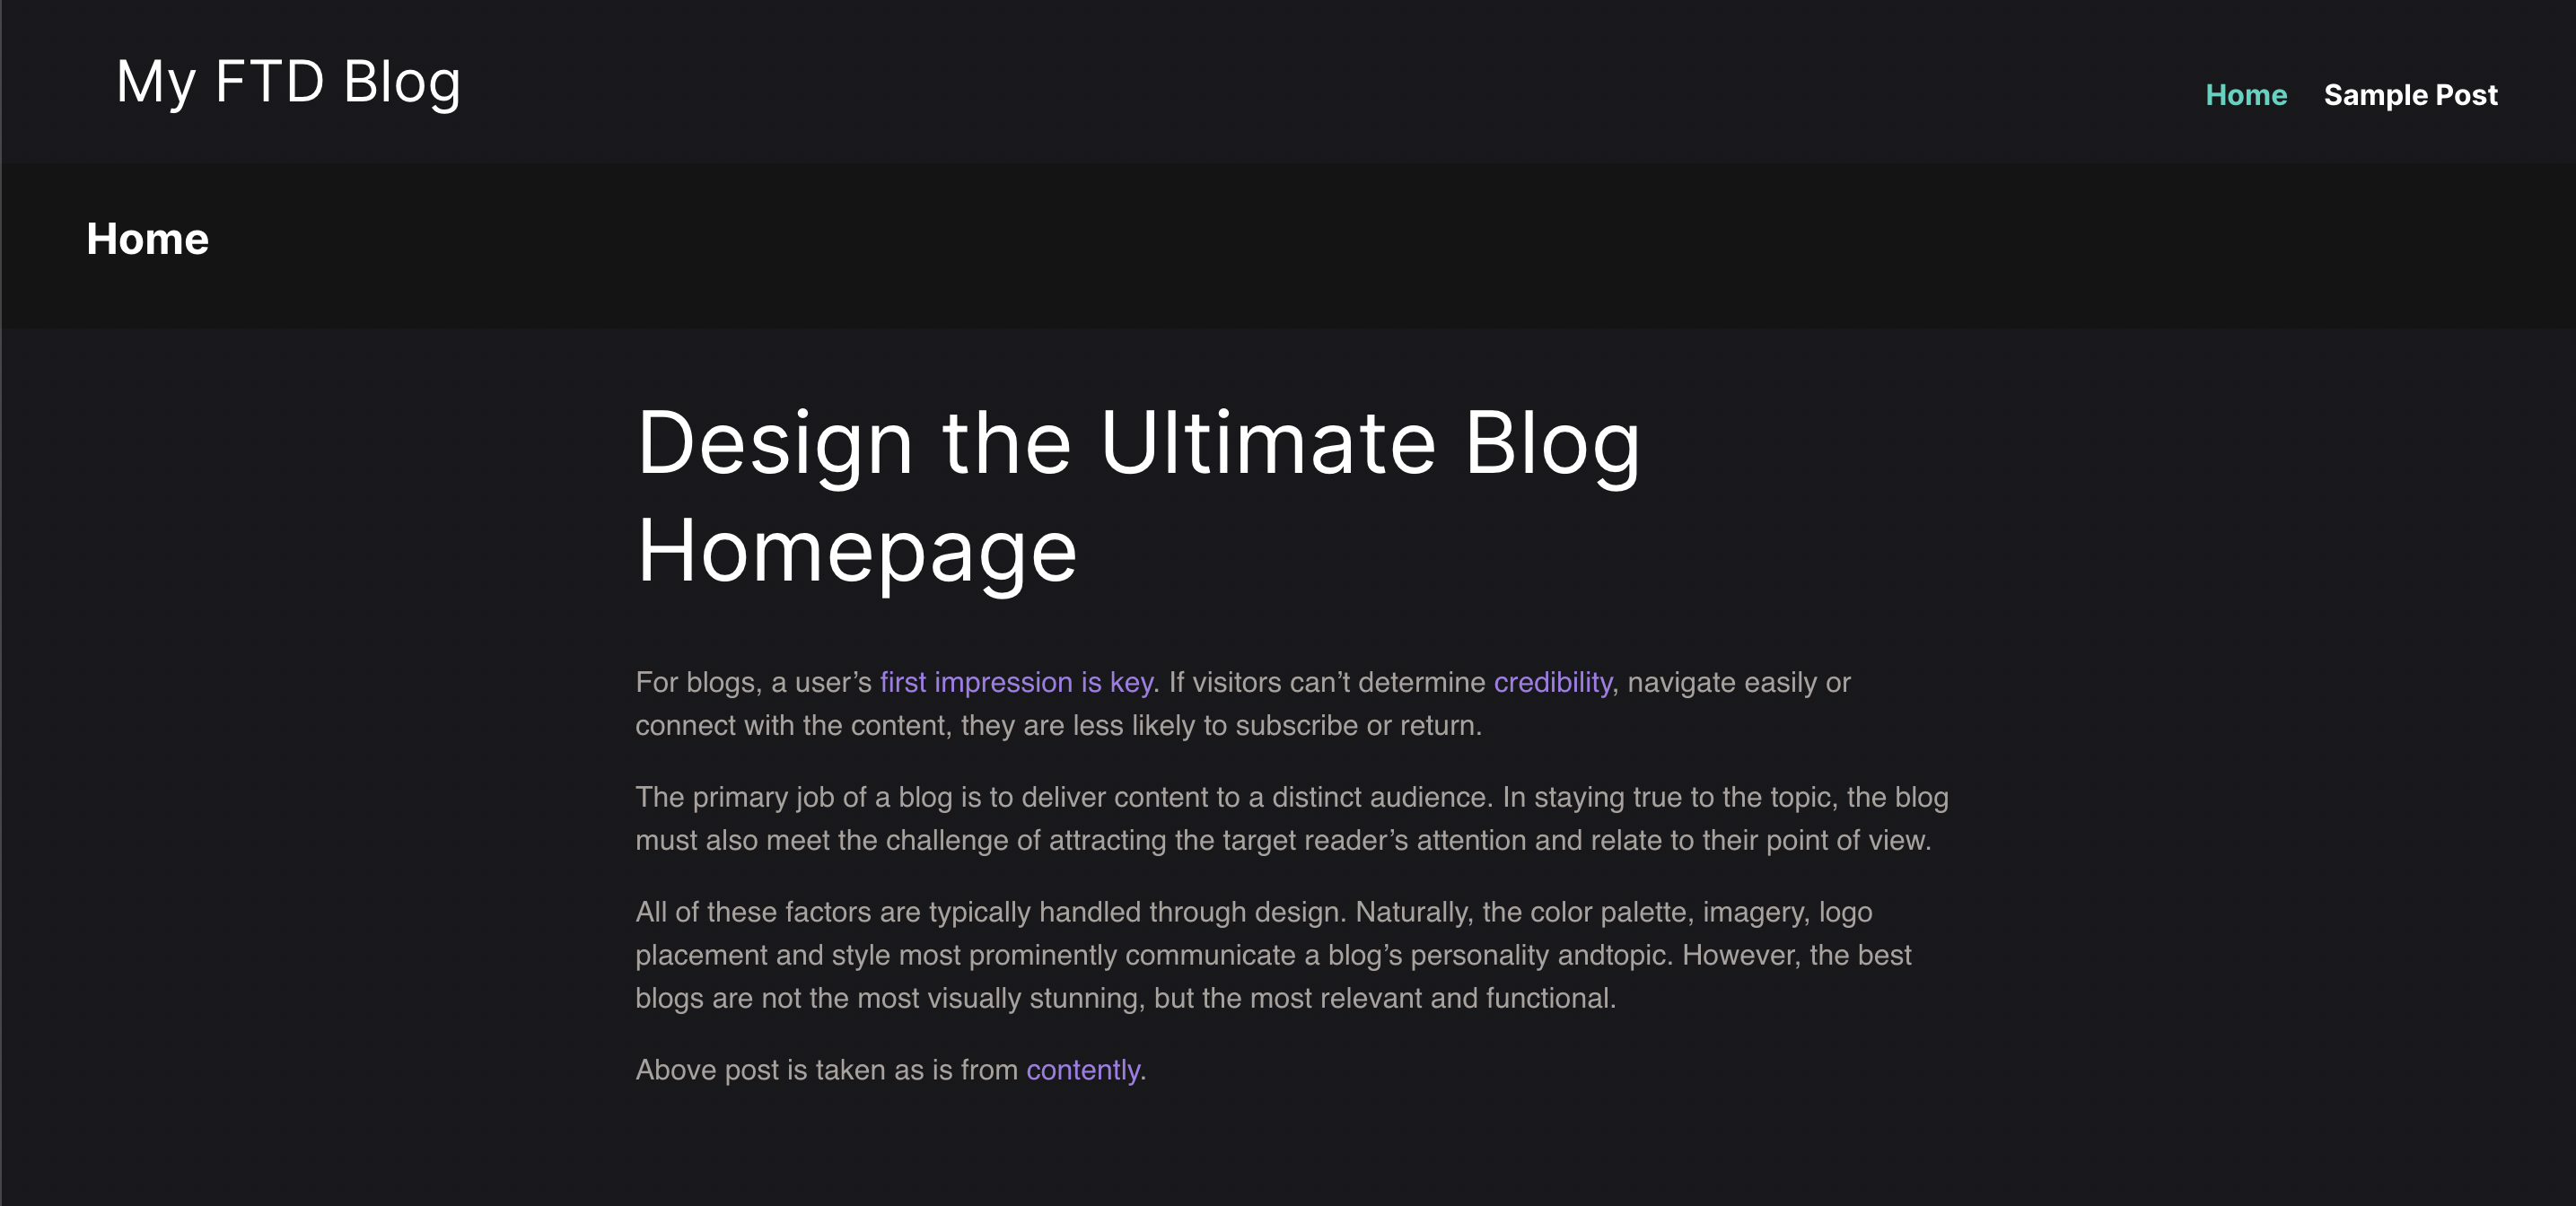
fpm.sitemap feature implemented 👍Using FTD components inside doc-siteFifthTry has designed many FTD components for authors. By following simple and easy steps you can use these components into your FTD projects.
According to your need you can use these components. Click here
For example you want to use our bling components. To use bling library you need to add -- fpm.dependency: fifthtry.github.io/bling into FPM.ftd file.
Since bling library comes with many components. Visit bling library demo and choose component you are looking for.
Lets say if you are looking for an sidenote component. Which highlights important part of content inside your page.
Watch below video which explains - how to add FPM dependencies?
FTD components inside doc-siteFifthTry has designed many FTD components for authors. By following simple and easy steps you can use these components into your FTD projects.
According to your need you can use these components. Click here
For example you want to use our bling components. To use bling library you need to add -- fpm.dependency: fifthtry.github.io/bling into FPM.ftd file.
Since bling library comes with many components. Visit bling library demo and choose component you are looking for.
Lets say if you are looking for an sidenote component. Which highlights important part of content inside your page.
Watch below video which explains - how to add FPM dependencies?
Using sitenote component from Bling component libraryClick here to visit sidenote documentation.
Its very easy to add any FTD dependency in FPM.ftd file. Use below code snippet to add sidenote dependency in FPM.ftd file.
sitenote component from Bling component libraryClick here to visit sidenote documentation.
Its very easy to add any FTD dependency in FPM.ftd file. Use below code snippet to add sidenote dependency in FPM.ftd file.
sidenote as dependency inside FPM.ftd-- fpm.dependency: fifthtry.github.io/bling -- fpm.auto-import: fifthtry.github.io/bling/sidenote
fpm.auto-import sidenote will be auto imported into all .ftd files inside your FTD web project. Just add below code snippent and change its default content with your content for a sidenote.-- sidenote-- sidenote.sidenote: Lorem ipsum dolor sit amet, consectetur adipiscing elit, sed do eiusmod tempor incididunt ut labore et dolore magna aliqua. Ut enim ad minim veniam, quis nostrud exercitation ullamco laboris nisi ut

Using blog on doc-siteFifthTry doc-site static/manual blog components are ready to use. By doing some changes you can start using blog components we have designed for you.
These blog components are as follows:
- Blog meta - meta for the blog
- Blog article - blog articles
- Blog authors - author bio
- Blog featured post list
FifthTry doc-site static/manual blog components are ready to use. By doing some changes you can start using blog components we have designed for you.
These blog components are as follows:
- Blog meta - meta for the blog
- Blog article - blog articles
- Blog authors - author bio
- Blog featured post list
How to edit README.md file?Click on edit icon at right side of your README.md file on your GitHubrepository page. GitHub will open live editor for your README.md file. You can make changes to it and click on Commit changes button to save your changes.
GitHubrepository page. GitHub will open live editor for your README.md file. You can make changes to it and click on Commit changes button to save your changes.